Want to import Canon XF605 MXF file to Final Cut Pro X for editing? We will tell you how to convert 4K XF-AVC to FCP X best editing video format and codec on Mac easily. Please keep reading.
The Canon XF605 Camcorder is brimming with high-end features, from a one-inch 4K UHD CMOS sensor to its five-axis optical image stabilization. It features multiple recording modes including Frame, Interval, and Slow and Fast motion up to 120fps in FHD. You can ensure your shots will be sharp, focused, and smooth. XF605 can shoot 10-bit 4:2:2 4K UHD footage in XF-AVC and MP4 formats to dual SD cards for easy post-production and quick delivery.
If you recorded some wonderful 4K MXF videos with Canon’s new 4K UHD 10-Bit Professional Camcorder – XF605, you may want to save them on your Mac for playing anytime you like or editing them to create your movie masterpiece. But if you want to edit Canon 4K MXF videos in Final Cut Pro, you may find that these MXF videos just gray out. The reason is that currently XF-AVC is not supported by Final Cut Pro X well. In order to import Canon XF605 MXF footage to Final Cut Pro, you need to convert MXF files to Final Cut Pro friendly formats first. And that is something I want to cover with you on this particular page. Let’s take a little look at how you can go about transcoding Canon XF605 MXF to FCP with ease.
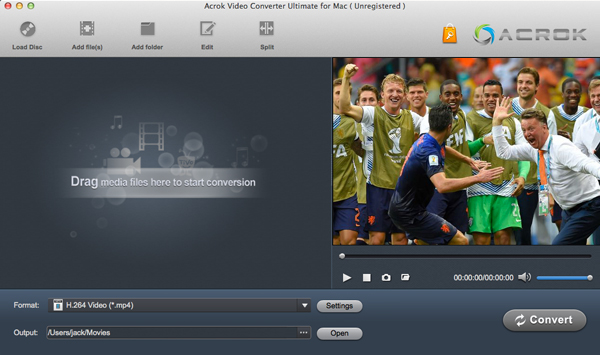
To change MXF to Final Cut Pro format, Acrok Video Converter Ultimate for Mac is highly recommended. It is the best 4K Video Converter for Canon, JVC, Nikon, Sony, Panasonic and Fujifilm cameras/camcorders. It is a powerful video covnersion tool and Blu-ray ripping software. With the Mac Apple ProRes Converter program, you can easily convert MXF videos to Apple ProRes 422, Apple ProRes 4444 MOV and then directly import the converted video to Final Cut Pro for editing. No extra tools are required and the original quality of Canon XF605 video will be kept. Below is a step-by-step guide on how to convert 4K XF-AVC to edit in Final Cut Pro X.
Download MXF to FCP Converter for Mac:
How to convert and import Canon XF605 MXF files to Final Cut Pro
Step 1. Load Canon XF605 videos
Launch the MXF to FCP Converter, directly drag & drop Canon XF605 XF-AVC footage to the program. Or go to click “Add file” button to locate the .mxf files you want to add.

Step 2. Select ProRes MOV as output format
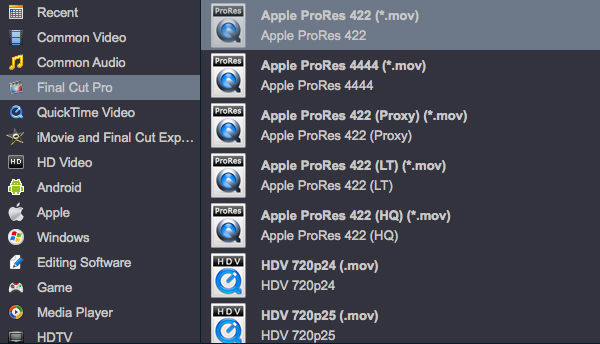
After the window shows up, it’s time to choose Final Cut Pro best editing format as the output format. To do this, you need to select “Apple ProRes 422 (*.mov)” from “Final Cut Pro” category.

Tip: The Canon XF605 record footage with 4K, but you may find that the output ProRes MOV is not such high in resolution, therefore, you can type the output file size as “Orginal” from the “Profile Settings” window to maintain the original 4K video quality.
For importing and edit Canon XF605 MXF in Premiere Pro CC and Vegas Pro 18 smoothly, you need to select H.264 MOV or MPEG-2 MPG as output format. You can get the profiles under “Editing Softwre” category.
Step 3. Start MXF to ProRes MOV conversion
This Canon XF605 to Final Cut Pro converter will convert XF-AVC .mxf files rapidly, preserving 100% original quality. When finished, the output file is ready for being imported to FCP for editing. All Final Cut Pro versions are supported, including FCP X, FCP 7 and FCP 6.
Step 4. Import the converted MXF to FCP
Finally, launch Final Cut Pro X. In FCP X, go to the File menu, choose Import > Movies, and then navigate to the folder that your output video files are saved. Select the files and click “Import”.


Comments are closed